There are two different ways to create a trace:original document:
From an Initial PDF - 3.1
Using a pre-defined Template - 3.2.

Initial PDF
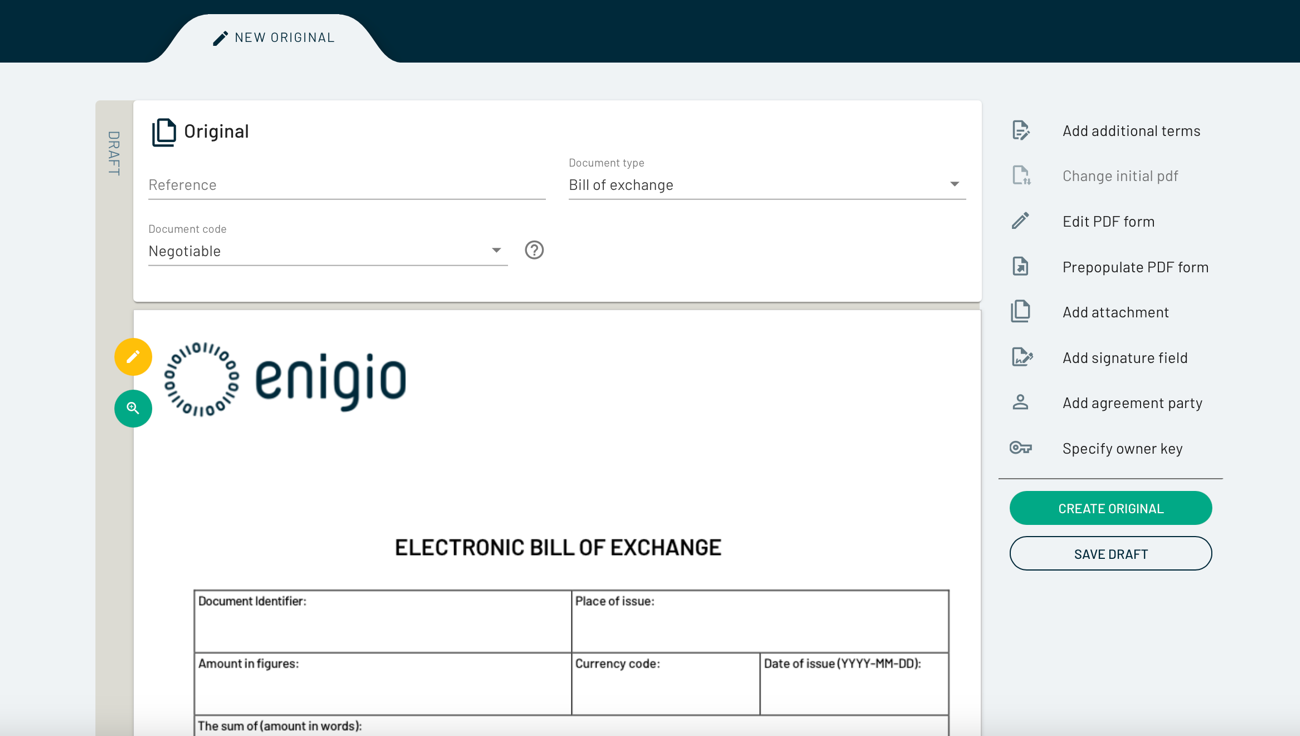
Click on “INITIAL PDF”.
Choose your PDF file (ideally use a digitally born PDF that has not been scanned from paper unless the intention is to Create from Paper (CTP) original).
Add your own Reference (this can be any unique reference used for documents in your own process).
Specify the Document type (choose from the drop-down menu or if you cannot find a pre-defined type you can write your own as free-text). This category will be added to the document structured data and can be thus be recognised by systems receiving the document .
Specify the Document code from the drop-down menu. This specifies the quality of the document, if it should be a Negotiable, Title, Registry or Agreement.
You can now click on any of the menu items to optionally perform the following functions as required:
Add additional terms
Change the initial PDF if needed
Add attachments: click on the icon and Select File, attachments will become an integral part of the original content and cannot be subsequently removed. Attachments can be any of the formats PDF, PNG, JPG, XML, JSON, YAML or ZIP.
Add signature field. You can add multiple alternative signers on behalf of the signing party in one signature field. The number of signature fields = the number of parties to sign the document.
Add agreement party (if party needs to be machine readable and original was not created from a template or from JSON data).
Specify owner key (if the original that is to be created should be created on a specific public key, maybe a key managed in addressbook for a specific client).
When you are ready to create the trace:original document, click on “PREVIEW & CREATE”. If you are not ready to issue it yet you can press “SAVE DRAFT” and return to it at another time.
Template
Click on “TEMPLATE”.
Here you can have any number of your own prepared and pre-loaded PDF templates created from a PDF form created by you or someone else and associated with a JSON schema.
When opened, as a user, you will see two different things depending on if you are a Super User or not.

The list of added Templates will be seen. On the top there is as banner where the possibility to "ADD NEW TEMPLATE" and "EDIT TEMPLATES" will be available if you are logged in as a Super User role.
If you are not a Super User you will be able to search, sort and select a template to start from when creating a new original.
To add a new template from an existing PDF form and possibly a mapping JSON schema, as a Super User you press "ADD NEW TEMPLATE"
The following view will open:

To add a PDF form that fulfils the requirements (Acro Forms PDF format supported, not XFA, and only form fields with TXT type) press "ADD PDF FORM".
Select a PDF Form from the File selection dialog.

Fill in Name, Agreement Type, Document Code and if applicable Organisation.
It is not required to add a JSON SCHEMA to map to the PDF Form. If not, a created original from the template will get the fields existing in the PDF form documented in the Structured data under the "Initial PDF" data node and the "Pdf form info" data node.
If you want to map your form towards a standard JSON schema e.g. from any standard organisation or institute you should make sure that the PDF Form has a field corresponding to each value in the JSON schema and that the fields of the PDF Form match the names of the keys/nodes in the JSON schema.
If you have such a JSON schema that you have created "in house" or want to point to a standard schema published online select either File (if you have the Schema as a file) or URL for a published JSON schema online.

When everything is ready you can press "CREATE TEMPLATE" and the new Template will be added, sorted under the Agreement Type in the list.

As a Super User you can also "EDIT TEMPLATES", when selected all Templates will start "wiggling", select the one you want to Edit and update or delete.

As a normal user when you want to create a new original from a Template you click on it and it will open in the Create view.

The system recognises that this is a Template and provides the small yellow Pen on the top left and the new menu choices Edit PDF form and Prepopulate PDF form (the latter if a JSON schema is associated).
If you click on any of these two the form field will be opened in a dialogue.

If example values have been pre-filled in the form, it will be displayed in light grey and it is possible to start filling in the form fields.
Fill in all fields and press "UPDATE PDF FORM"
If a schema has been associated a JSON data file matching the schema can be uploaded by clicking on Prepopulate PDF form and the values from the JSON data file (if matching the schema) will fill in the values of the PDF form matching the right fields from the schema.
If a schema has been added and the format of any of the fields are not matching the Schema rules, an information error will be displayed.

Otherwise if all data is correct the PDF Form will be updated with the entered values.

Now it is possible to continue to create a document original like for standard initial PDF drafts.
A schema that is added will be stored as a "Custom Data Schema" in structured data and the schema values will be put under Custom data".

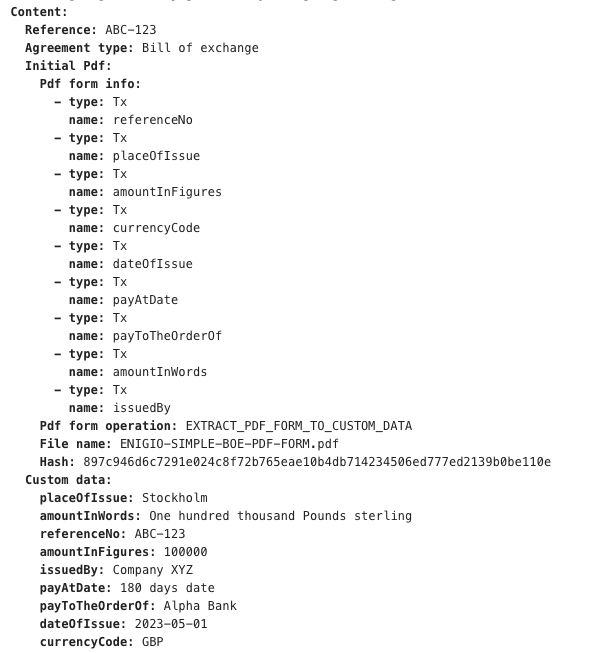
In this example as the PDF form template is filled in with data, the Custom data is filled in from the PDF Form (EXTRACT_PDF_FORM_TO_CUSTOM_DATA).
How to add signers to a trace:original document.
You can add signature fields to a trace:original document when you create it, or after you have created it, by clicking on the “Add Signature Field” icon on the right.
Click on “Add Signature Field”. You will see the following screen:

Under “Signature Field”, fill out the details of the company:
Mandatory - Capacity of Signatory (e.g. Authorised Signatory/CEO/Captain etc.)
Optional - Role (in free text or from the drop-down menu, e.g. Buyer, Seller, Guarantor, Carrier etc.)
Optional - Enter Organisation name (e.g. Enigio AB)
The signing expiration date is default configured for 2 weeks, update this if link expiry should be shorter or longer; You can renew the signature if required.
Under “Signer”, fill out the details of the person signing.
Mandatory - Enter Name
Mandatory - Enter Email and maybe additional ID depending on which e-signature is available for the node
Optional - Enter Phone
You can add as many “ALTERNATIVE SIGNERS” as you like. Once the first of these alternative signers has signed the document, the other alternative signers will no longer be able to / need to sign the document.
Ordered signatures
When adding more than one signature field it is possible to activate the "Ordered Signatures" option.
Each signature field gets a green number (a drop-down) setting in what sequence signatures should be completed.
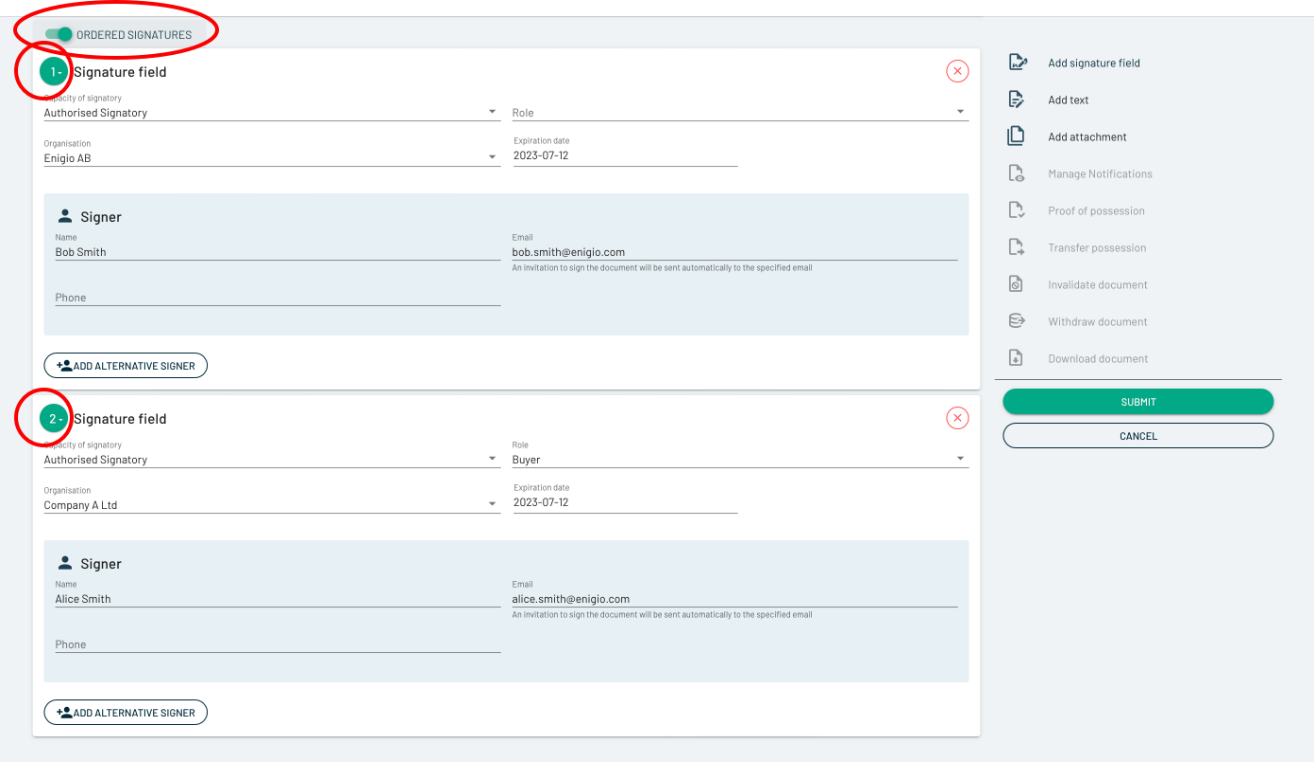
In the example above, when Submit is pressed, a signature link will first be sent to Bob Smith. First when Bob Smith has signed the signing link for Alice will then be subsequently sent out.
If there are multiple signature fields with the same number all signers with that number will get a signing link sent out at the same time, and when all signatures on a specific position have finished signing the next one in the order is sent out for signing.
Signing emails
Signing emails (automatic signing link email is default) will be subsequently sent to each Signing Party’s email addresses.
An example of such email is below (The layout, wording and format of the email is possible to configure specifically for each node):

Each Signing Party will need to authenticate their signing link by entering their email address to which they received the signing request.

The signing party will then receive a One Time Password to the email address they entered, which is valid for 5 minutes (or as configured). Once you enter this code, you will be able to review the trace:original document to Sign.
Click on SIGN.
You will be redirected to the e-signature provider that is connected to your node and can perform the signing:

Follow the instructions to sign electronically and you will then be redirected back to trace:original.
You will then receive confirmation that the document has been signed.
You can then download and store a verifiable version of the signed document by clicking “DOWNLOAD”.
You will see that the signature has been appended to the end of the document as the latest appended increment. Open the document using Adobe reader.
The authenticity and version of the document can always be verified by anyone using
Preview and Create
Once you press “PREVIEW & CREATE” you will get the chance to preview and check your document:

You will see on the last page of the Preview that trace:original has applied a unique “trace:original id” to this document. This will be noted against the ledger so trace:original can verify and track the document.
After you have created the document, you will see it in your ORIGINALS tab:

You can click on this document and view it, along with the audit trail on the last page which shows all actions that have been performed on this document.
If you have added Attachments you will see an Attachments tab, if you click on that you will be able to see all attachments in the current original.
You can also click on the “STRUCTURED DATA” tab which shows the associated data files. This is the machine-readable component of the trace:original document.
